Sunday, May 22, 2011

Fun, Easy, Fast Tee Shirt Embellishment!

May 22, 2011

Fun, Easy, Fast Tee Shirt Embellishment

I don't like plain tees and I try to personalize everything.
I bought some inexpensive tees at Target ($4.99) and gave them a Camille improvement.


First make a template proportionate to the tee.
(I love templates!)


Iron interfacing to the fabric you are using.


Purchase interfacing that you can easily tell the back from the front.


Trace the template backward on the interfacing side.


Cut out.


Slide a book in between the front and back of the tee for easy pinning.
(Awesome tip for a lot of projects.)


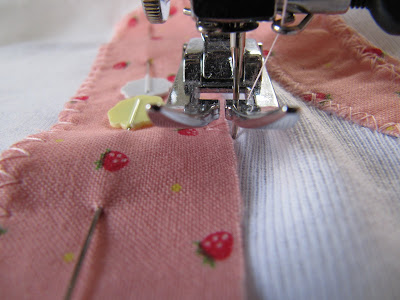
Over pin (always) and sew things with cut outs from the inside to the out.


Iron as you go.


Using a big zigzag stitch sew the fabric making sure the outside stitch sews outside of the tee to prevent fraying.

Double zigzag!


Freya's muscles score a ten!


Stupidly I cut a hole in the tee when I was trimming my thread ends.


Mistakes add character I think.


I hope you enjoy this tutorial and if you embellish a tee please leave me a link so I can see them!


Cheers to a new week.

I hope the weather where you live is sunny and I hope the weather were I live is sunny so I can play in the dirt!

Thursday, May 19, 2011

Catching Up And A Sewing Tip

May 20, 2011

I though I'd write a catch up post today.
I was going to wait until Monday but in case the world ends tomorrow I would like to write a few things. (This is a very long post but you will be rewarded with a ruching tutorial at the end.)

My sister Katie had a birthday party for Teah (4) two Saturdays ago.
Kate lucked out as that was the only nice weekend we have had in Utah for months.


Teah with her first big girl bike.
It's one of the momentous gifts of childhood and new phases.


I wanted my dad to make Freya a doll house last Christmas but I asked mid- November and there wasn't enough time.
The girls are getting them for their birthday's this year.
All of the girls in the family have summer birthdays which is fun.
Teah and Freya will have their own doll house and my brother Nicholas' four girls will share a house.


My dads own design.
I get my creativity and confidence to create from my dad.


Kai looking through the window.
It reminds me of Alice In Wonderland.


Me and my grandma Billie.

We had a nice day Tuesday knitting and watching The Fighter. (A+ movie)

Freya has finally shown interest in the sewing machine she wanted so badly for Christmas.

I was impressed that she remembered how to thread it from me teaching her last January.


Monday Oliver watched Teah and Kai.

Chris snapped these photos of Kai and Oliver cuddling.


My friend Joan is having a major antique sale mid June.

They have to empty three storage units and will be selling the contents a little above cost.

She wanted to invite some of her artist friends to set up booths but Midvale City won't let her.

Regardless of the rules she wants me to sell some of my wares!

I'm excited to make some money of my own!


New Paul's (my pattern).


Another original creation.


Baguette rabbits.

Not my pattern.


I love making these baguette rabbits because I have a use for all the funky linens I've collected over the years.


I thought I would do a small tutorial on how to ruche.


Ruched pink linen.


I cut my fabric the length of the rabbit plus 10".

For small projects length plus 10" works well, length will vary on larger projects.


Set your sewing machine stitch length to the very longest.


Sew the length of both sides of fabric leaving very long tails.

I use quilt weight thread when I gather or ruffle any fabric. It's just easier.


Long tails.


Pull the tails to gather. Knot the ends when it is the proper length.
Gather the other side to match the top. Knot the ends.

Knotting the ends keeps your gather when you sew the ruching on to your project.


Change your stitch length to sew the ruching.

Pin the ruching into place.

Always over pin. It's just easier.
Using the gathering stitch line, sew the ruching to project


Fin!


If the world ends tomorrow it was nice knowing you my friends.

P.S. I hope it ends with aliens landing, like War Of The Worlds.

Saturday, May 7, 2011

Rabbits and Ian Curtis

May 7, 2011

Rabbits and Ian Curtis

I finished off an amazingly productive day with Ian Curtis.
If I were to ever get a tattoo (which I would never) it would be this photo of Ian Curtis.


Oliver cleaned out his backpack for the first time this year and casually flops these two certificates on the table as I was sewing last night.
4.0's ? No biggy.


As I was sewing yesterday I made a consciences effort to note the tricks I use to make sewing fast and enjoyable.

When I work with linen I use two pieces to match the weights of the other fabrics and so the stuffing won't stuff out.
I sew seam lines (straight stitch and zigzag) before cutting out the pattern piece to prevent it
from fraying when I handle it, because that's a mess and headache.
I also did this to the weird upholstery fabric because that was a fraying nightmare.


To transfer marking points from a template to fabric poke some guide holes.

You can use a thick pin or small nail.

You don't have to use a fancy antique awl like me but it's cool if you do.


Make guide holes. I used a pencil.


Then I connect the dots with disappearing ink.


Sewing softies became a lot easier when I found these long ass 'doll making' needles.


A random picture to note that I stocked up on my chapstick supply.


Two finished rabbits.

Ian 1 and Ian 2.

A Mothers Day gift and a birthday gift.


I don't plan my embellishment they generally pop up themselves near the end of a project.

Just happens.

My best advice for spontaneous embellishing is collect pretty things you love.


Happy weekend.

Let me know if my sewing tips were helpful and I'll note more again.